Friday, 7 September 2012

Ah, the weekend!

I couldn't really be bothered updating the blog during the week, with all the overtime at work and also having some stomach bug I found it hard to find time. But hey, the weekends here and it's time to get into it and update the blog!


During the week I stopped at Bunnings and picked up a few things I need to continue the build. While there I looked at render but seeing as I was on my bike I wasn't going to lug a 20kg pack of render in a backpack so I left that. I was fairly lucky, they had a clearance rack up and where selling off a whole bunch of painting stuff and I managed to pick up a can of concrete sealer and a tin of wrongly coloured paint. Got twice the amount of sealer for the same cost and the paint was over 50% off. Bargain! I also picked up some more liquid nails, surprisingly I used more than I thought I would and after today I think I may still need another tube. I also bought some timers, I only need one but the twin pack was cheaper than a single one, so I figured a spare can't hurt. The timer will be used to run the fogger unit, so it only comes on when I want it too. Also my second glass door handle arrived.


Today I had the car so I stopped by the reptile store to price up substrate (bedding) as the local pet store seemed rather expensive when I looked. I was right, reptile store was a lot cheaper and when I need it I will head back there for some. While there I discussed a UV light, it seems I don't need one as my snake is nocturnal so the infrared heat lamp will be sufficient enough, sweet! Then on the way home I stopped at Bunnings again and picked up the render and a small paint brush for the small nooks and crannies.
 

I also made a small pitstop for some refreshments!


To finish off the rock wall I started by cutting up bits of both the 10mm and 20mm polystyrene sheets to random shapes and sizes (as well as using any offcuts I had from making the side shelves). I randomly attached them to the side with liquid nails.


I just placed them roughly and as they where.


All around the sides and back, leaving the spaces clear for the various things I marked.


Once done, I left the adhesive to dry and moved on to making the fogger container.


As said in a previous post, the original idea for a small deep container wasn't going to work due to the fogger spitting out water. So I came up with an idea for a larger more oval shaped container with a lid open at the two long ends. Hoping this would stop most the water splattering over the sides. I made a mock up of it and tested it out, it seemed to work rather well so I went ahead and started putting it all together.


My daughter often comes sits with me in my shed while I work, asking so many questions and wanting to play with all my stuff. For now my safety glasses and ear plugs kept her happy.


I attached some mesh to the container, this will keep the snake out of it as the fogger unit does get a little hot. Also once the container is finished if she gets inside it may be quite hard to get her out if the need should arise.


It may not look like much but the container is glued together and ready for the next step. Just need to let the adhesive set.


While waiting I started to shape the rock wall, honestly I started rather gently and slowly but I found that a quick and heavy handed approach worked much better for this. I used a box knife and scraped at the pieces I had attached earlier in the day.


Scraping the edges I shaped the pieces to resemble a rock type face. As you can see this process is also really messy, the mess you see isn't even quarter of it as I kept vacuuming it up. Surprisingly this was actually rather quite tiring on the arms but the refreshments helped there!


After a fair bit of effort (and beer) the rock wall was all done. Now all that is left is to cut out the spots for the thermostat and the two thermometers (I bought 2 thermometers on ebay the other day but they haven't arrived yet, BAH!) and then to render it tomorrow.


Above is the fogger container, it isn't finished as the adhesive was still setting and it was time to my daughter to bed. So I still need to shape it, which I think I will go do now! Oh, I also decided I can't be arsed adding a price list to every post so I am just keeping a list and I will add it every now and then and also on the final build blog.

Sunday, 2 September 2012

Starting the rock wall

As stated yesterday I started the fake rock wall and continued it today, I got a fair amount done and honestly I am further ahead than I thought I would be at this stage. A good change as things where not quite moving as quickly as I had liked, now things seem to be on track. Now before I begin I would just like to say, this rock wall is not my idea, I read about how to do it years ago on a reptile forum and wanted to try it. The design however, is totally mine.

WARNING: This process is VERY messy, make sure you have a place to do it where the mess won't matter, where there are no small children that shove things in their mouths or animals to sniff up the little bits of polystyrene. The bits can easily get stuck in the nose or throat.


I used the 10mm thick polystyrene to make backing for the rear and sides of the rock wall. I marked and cut out the holes for the heat cord, heat lamp, vents and fogger.


Next I began making a rock shelf for the right hand side, something for my snake to lay on when she wants to soak up the heat from the lamp. This involved cutting some rectangles to the size needed and then just shaping the outer bits. I messily cut the shape with a sharp box cutter and then used my fingers to break the edge up giving it a more natural rock like appearance. Once rendered this should look like a proper rock face (I hope).


I decided to make a little alcove in the rock face, this will give the snake somewhere to explore as well as curl up and sort of hide if she wants too. I think it will also look rather nice.


I was originally using the multi purpose glue to stick the pieces together but I left the half I built yesterday overnight only to discover it had not stuck together. So I switched to using the liquid nails, this worked a treat and set fairly quickly making the whole process easier. During the construction I broke toothpicks up and used them to hold the pieces together as the adhesive set, this will also add extra strength as well.


Using the liquid nails and toothpicks I attached the final left hand side rock face to the backing.


I then placed the whole thing inside the vivarium to check the fit as well as the look and then left it in there to set to ensure it was set to the right angle. Then I went and had some lunch, once it was set properly I removed it and filled all the gaps behind, in the alcove and around the backing with the gap filler I had, just to make sure there was no where for the snake to get into that I couldn't get her out of, also to make sure the end product is moisture resistant.


I pulled most the stuff out my old vivarium, all except water bowl and hides. I checked the fitting of the board I used to lay the heat cord out, I needed to cut the corner off to fit it into place. 


The adapter and plug for the heat cord sits nicely tucked away under the rock wall and behind the backing and exits out the rear of the vivarium. This will keep it hidden and easy to hook it all up.


Just a few of the pieces I pulled out of the old vivarium, there is also a bunch of loose branches and some fake plants. But those will be positioned and sorted once the vivarium is complete and everything else is in place.


Next I cut out the holes so I could mount the branches, these are attached to brackets and will be bolted through the back of the vivarium.


I ended up using the brackets I bought for the table to mount the smaller of the branches I had.


I also had a fake rock, so I used this on the right side, this will give another place for the snake to curl up. She could often be found curled up on this in the old vivarium. I attached it will toothpicks and liquid nails. I will be rendering over this as the colour is not the look I am going for, I am going for a red-brown rock look as that is the colour of the species natural habitat.


At this stage I decided to have a beer (or two) and it kind of went straight to my head and I got a little carried away and forgot to take pictures. I built a little shelf with another alcove for the right hand side. Attached it to the backing and placed it in the vivarium for it to set. I'll have to use the gap filler on it tomorrow as honestly I am exhausted and can not be bothered doing anymore tonight. Oh as you can see, at some point through the process I marked out where the hides, water bowl and fogger will sit to make sure once I start creating the rock wall more I don't block off the areas.

So now I am a far bit ahead of where I thought I would be, so things are looking good and I am happy. Though I am really exhausted I can barely do anything, my shoulder is hurting badly (injury that has been playing up and been causing me some serious grief lately) and I have had enough.


Revised price list
(brackets added back onto list)

Vents - $26.20
Cord (IEC to twin IEC) - $15.53
Cord (IEC to 240v) - $11.45
Liquid nails - $3.90
Cord holders - $4.00
Power board - $20.39
Bolts, nuts and washers - $6.98
Stick on feet - $3.98
Fogger - $38.05
Handles - $3.90
Plants - $29.90
Polystyrene - $29.00
Glass Track - $19.15
Glue - $8.95
Hinges - $1.45
Silicone - $4.97
Brackets - $1.70

Total - $229.50

Saturday, 1 September 2012

What a day!

It all began at 5am, I woke early and could not get back to sleep so I thought "bugger it" I may as well get the day started. I got up and made myself a coffee and some vegemite toast, sat at computer and looked at a few things while having my breakfast. Then I packed the stuff I bought yesterday from Bunnings, my lunch and hopped on my bike and headed into work to get the build under way.


I bought some multi-purpose glue, clear silicone, hinges and the glass tracks. Not too much, glass tracks cost the most but still not much. They had white ones but they charge $3.00 more for white so I thought it wasn't worth it seeing as the tracks will be hidden behind the supports and also that the main colour of the rocks, bedding, hides and water bowl are all brown-ish.


Once I got to work I spread out my gear on one of the benches, this makes things a lot easier. It's good having so much room to move and benches to work on. Way better than doing this at home.


Then I sorted out my pieces and began constructing the table first, this was the easier thing and seeing as it was like 6am I thought it'd be best to work on the easy stuff first till I woke up more. This chose to be a wise choice as I blew 2 nails out the side of the shelves. Thankfully it was at the back so it won't be seen, though the one that went into my finger sure did hurt!


The shelves didn't take long to build, though I did stop to make myself another coffee.


Attaching the door was a bit of a pain, the screws supplied with the hinges just wouldn't hold very well in melamine, so I used some bigger ones I had that are suitable for chipboard. Doesn't look as good but are a lot stronger, hinges aren't seen so looks are not highly important, working hinges are.


Over that hurdle and the door was attached, the saw being out of calibration when I cut the other pieces meant the piece I cut for the door today was smaller than the rest of the shelves. So there is quite a large gap around it, ah well, not that big of an issue. Least it works.


I found some push open/close latches in my shed yesterday, so I decided to use these on the door. There is no need for a handle and makes a nice clean look to the outside of the door, quite snazzy too I must say!


I put one top and bottom, though picture only shows one at the bottom. That was the shelving part of the desk finished. Now to construct the rest of it.


Final product looks quite good, I am very pleased with the outcome.


With the door closed, not bad indeed!


With the calibration of the saw being out when the pieces where cut, I discovered another problem. the leg of the table was 3mm shorter than the shelving leg part. So I just stapled some 3mm MDF on the bottom.


I had some gap sealer in my shed from when I had to seal around my shower screen. This actually came in quite handy, although it wasn't needed it did however help to improve the look of the table. Seeing as it is a white product, I used it to fill the joins and make next to invisible joints, not a bad idea I must say.


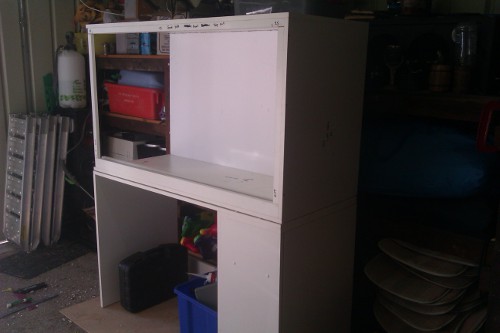
Next was to start putting the vivarium together, but first I stopped for a coffee and some morning tea with the owner of my work and the guy from next door who was in lending a hand to move some racking around. Then the construction began, it started off quickly but soon slowed down as it got a little trickier. Above you can see the little rubber stick on feet I put on to prevent it sliding in the table.


Ah, attaching the front supports, this was a little on the tricky side as I only had one side attached. The other is being left off till the rock wall is complete so I have access to install it with ease then the side will be attached.


Front and front side supports done and I clamped the side on till the glue set and for a little added stability while I was working on the rest of it.


I used clear silicone to run around the inside of the vivarium where all the pieces join, this will ensure a water tight seal and stop any moisture getting into the wood and causing any swelling


Next I glued and clamped the glass tracks into place and left them to set while I went and had some lunch and more coffee.


I measured up the positioning of the heat lamp, marked and drilled the holes to attached it and then drilled the hole where the cord will go through the back and into the thermostat plug.


I did the same for the heat cord and adapter.


Also the fogger.


Then I measured, marked and cut out holes for the vents, I was originally going to use a jigsaw and cut them rectangular but I had my hole saws and thought it won't make that much of a difference to the ventilation and it was a lot easier and quicker just using the hole saw.


By this stage the glue had set on the glass tracks, so I marked, nailed and screwed the inside supports into place. This will ensure the glass will not come out, none of the bedding will get into the tracks and just neatens up the whole thing. Practical and cosmetic, things are going well but time is slipping away.


Attaching the back was simple and quick and brought me to the final stage, I siliconed up the joins at the back and on the rear front supports, gave it a quick clean out and packed up my stuff.


The owner let me borrow the work ute, I loaded my stuff, the table and vivarium into the back and headed for home. I dropped them off into my carport then headed back to work to get my bike. Once home I moved them into my shed.


I did start on the rock wall, got a few pictures but I figured I would leave that for another post. Once I do some more I will make a post about making that, for now I think this is enough. I'm exhausted, it's been a long day and I honestly can't be bothered writing anymore.


Revised price list
(new purchases added, brackets removed as they where not used or needed)

Vents - $26.20
Cord (IEC to twin IEC) - $15.53
Cord (IEC to 240v) - $11.45
Liquid nails - $3.90
Cord holders - $4.00
Power board - $20.39
Bolts, nuts and washers - $6.98
Stick on feet - $3.98
Fogger - $38.05
Handles - $3.90
Plants - $29.90
Polystyrene - $29.00
Glass Track - $19.15
Glue - $8.95
Hinges - $1.45
Silicone - $4.97

Total - $227.80